Skull Drawing Easy: Simple Steps For Your Next Artistic Creation
Are you eager to try your hand at drawing something a little different, maybe even a bit spooky or quite artistic? Well, learning to draw a skull, especially making it look good, might seem like a big challenge at first glance. But, honestly, it's not as tough as you think, particularly when you break it down into simple, manageable steps. Many folks, perhaps like you, want to create impressive art without feeling overwhelmed by complex anatomy or super detailed shading. This guide is here to show you just how accessible and fun skull drawing can be, whether you're aiming for something realistic, a cool cartoon, or just a simple sketch for Halloween.
So, too it's almost, if you've ever felt a little intimidated by the idea of drawing a human skull, you're certainly not alone. Lots of artists, even experienced ones, find certain subjects tricky. Yet, the truth is, a skull is a fantastic subject for practicing proportions, learning about light and shadow, and truly understanding basic shapes. It's a foundational element in many kinds of art, from portraits to character designs, and it can really help improve your overall drawing skills. We're going to explore methods that make this process quite straightforward, allowing you to create something you'll be proud of.
Actually, whether you're sketching for fun, working on a new design, or getting ready for an event like Halloween or Day of the Dead, mastering the basics of skull drawing easy is a valuable skill. It's a chance to build confidence in your artistic abilities and discover that even seemingly intricate subjects can be simplified. This article will guide you through various approaches, showing you how to start with basic forms and gradually add detail. You'll find that with just a little practice, you can easily draw a perfect realistic skull, or any style you prefer, with your own hand.
Table of Contents
- Getting Started with Easy Skull Drawing
- The Basic Shapes That Make a Skull
- Understanding Proportions for a Realistic Look
- Bringing Your Skull to Life with Shading
- Different Styles of Skull Drawing Made Easy
- A Little Bit About Skull Anatomy for Artists
- Tips for Improving Your Skull Drawings
- Frequently Asked Questions About Skull Drawing
- Your Next Steps in Easy Skull Drawing
Getting Started with Easy Skull Drawing
So, you want to draw a skull, and you want it to be easy, right? The key to making any drawing simple is to break it down. Instead of seeing a complex structure, you can actually see a collection of basic shapes. This approach helps you build the drawing piece by piece, which feels much less overwhelming. Many artists find that starting with these fundamental forms makes the whole process pretty relaxed and quite expressive, too.
You know, whether you're a complete beginner or just looking for a quicker way to sketch, this method works wonderfully. It helps you focus on the big picture first, then gradually add smaller details. This is the secret behind many "how to draw easy" tutorials, and it's especially effective for something like a skull, which has distinct, recognizable parts. We'll start with the very first mark you put on your paper, making sure each step is clear and straightforward.
The Basic Shapes That Make a Skull
The human skull, as complex as it looks, is essentially built from simple geometric shapes. Think about it, the main portion, which protects the brain, is more or less a sphere. The jawline and other facial structures then attach to this main sphere. By starting with these basic forms, you create a solid foundation for your drawing, making it much easier to get the proportions right. This is a pretty fundamental principle in drawing anything, actually.
To be honest, this method is what makes skull drawing easy for so many people. It takes away the pressure of getting every detail perfect right away. You're just placing shapes, like building blocks. Once these core shapes are in place, you can then refine them, adding the more specific features that give a skull its distinct look. It's a simple trick, but it really works wonders for your confidence and the final outcome of your drawing.
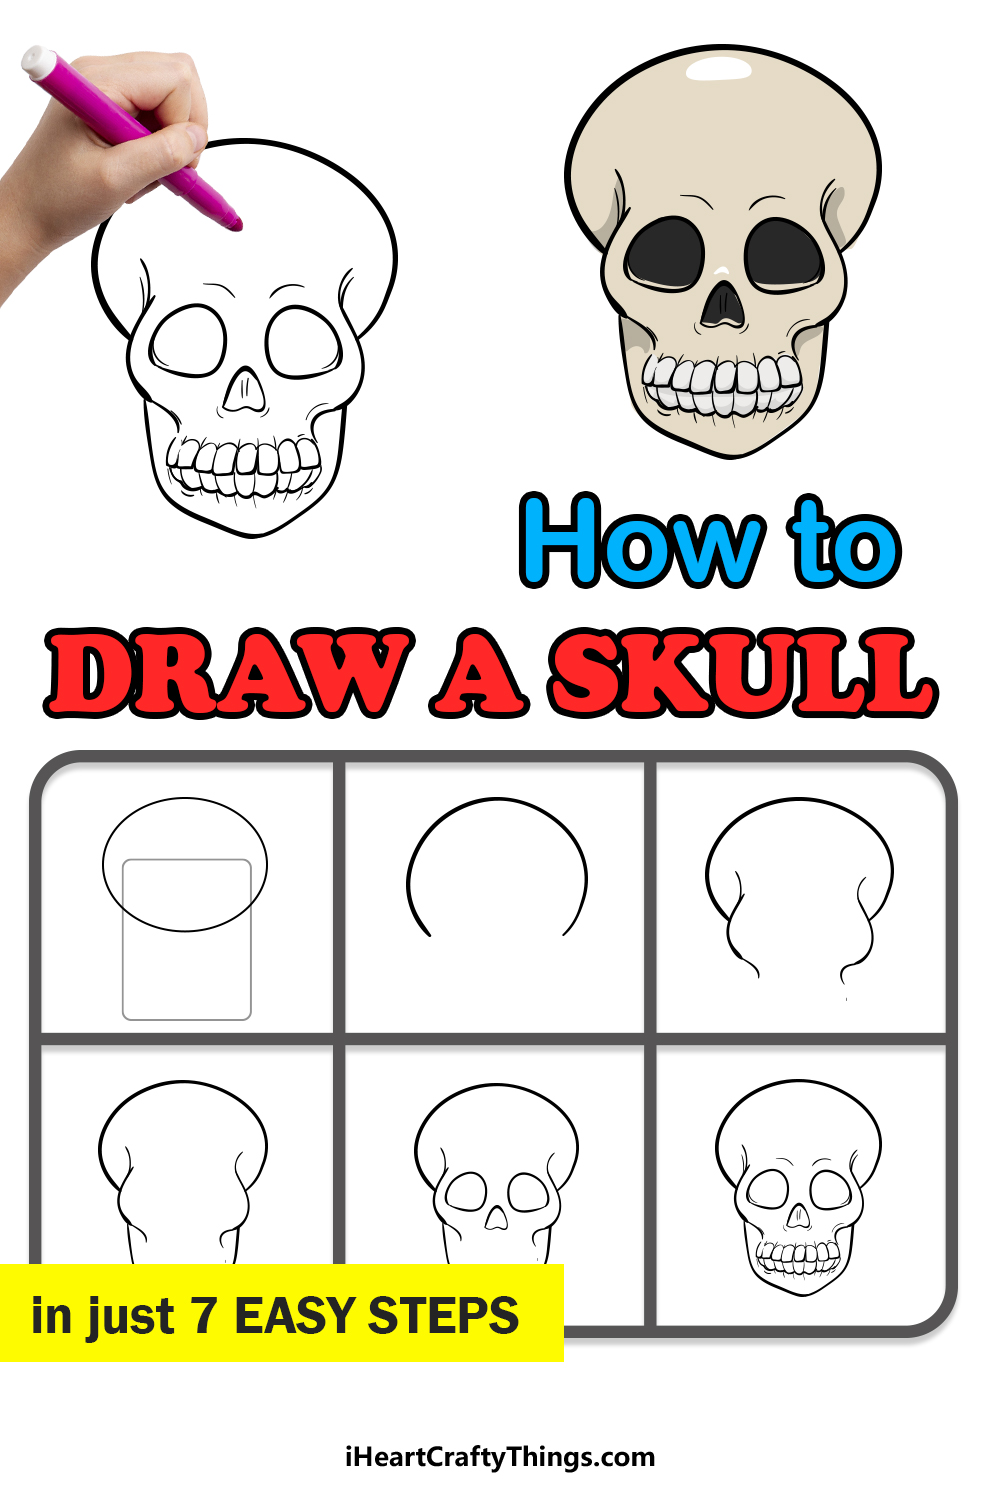
Starting with a Simple Circle
The very first step for a skull drawing easy approach is to draw a simple circle. This circle will represent the main part of the skull, the brain case. Don't worry about making it absolutely perfect; a slightly imperfect circle is perfectly fine. This is just a guideline, a starting point for your drawing. You know, it's pretty much the most basic shape you can begin with, and it's quite effective.
Once you have your circle, you can make a few faint guidelines inside it. These lines will help you place the jawline, the eye sockets, and other key features later on. Think of them like a blueprint for your skull. For example, a vertical line down the middle and a horizontal line across the middle can help you keep things symmetrical. This simple step, really, sets the stage for everything else you'll add.
Adding the Jawline and Facial Features
After your initial circle, the next big step in making your skull drawing easy is to add the jawline. This part extends downwards from the main circle. You can think of it as a U-shape or a more angular form, depending on the style you're going for. This is where the skull starts to take on its familiar appearance, you know, with a distinct lower portion.
Then, you'll add two smaller circles or ovals for the eyes. These will become the eye sockets. Below them, you can sketch in the nose opening, which is often shaped like an inverted heart or a simple triangle. Finally, lightly mark out where the teeth will go. These basic shapes for the facial features are crucial for establishing the overall structure before you get into any fine details. It's surprisingly simple, actually.
Understanding Proportions for a Realistic Look
For a skull drawing easy that also looks realistic, understanding basic proportions is quite helpful. You don't need to be an anatomy expert, but knowing where things generally sit makes a big difference. For instance, the eye sockets are typically about halfway down the skull's main portion, and the jawline extends roughly one-third of the way below the main skull shape. This kind of general knowledge really helps.
Using your initial guidelines from the circle step is key here. They help you place these features correctly relative to each other. With a little bit of practice, you'll start to instinctively know where everything goes, making the process faster and more accurate. This practice in proportion is also great for improving your general observational drawing skills, which is pretty cool, isn't it?
Bringing Your Skull to Life with Shading
Once you have the basic outline of your skull drawing easy, adding shading is what truly brings it to life. Shading creates depth and makes your drawing look three-dimensional. You don't need fancy techniques; just think about where the light source is coming from. Areas facing the light will be brighter, and areas away from it will be darker. This is, you know, pretty fundamental to making things look real.
Start with light layers of graphite, building up the darker areas gradually. Pay attention to the curves and hollows of the skull, like the eye sockets and the cheekbones. These areas naturally have more shadow. A relaxed, expressive approach to observational drawing means you don't need perfection here. Just try to capture the play of light and shadow as you see it, or as you imagine it. You can learn more about shading techniques on our site, which can really help.
Different Styles of Skull Drawing Made Easy
One of the great things about skull drawing easy is that you can adapt it to so many different styles. Whether you're aiming for something super realistic, a fun cartoon, or a spooky Halloween design, the basic principles remain the same. It's all about how you interpret those initial shapes and how much detail you add. This flexibility makes it a truly versatile subject for any artist, which is pretty neat.
For example, a realistic skull will require more attention to anatomical details and subtle shading. A cartoon skull, on the other hand, might use bolder lines and simpler shapes, focusing on expression rather than exact accuracy. This variety means there's always a skull drawing project that fits your mood or skill level. You can even create funky skulls for the Day of the Dead, which are often very colorful and decorative.
Realistic Skulls Without the Fuss
Drawing a realistic skull might sound like a big undertaking, but it can actually be quite simple if you focus on a few key elements. The trick is to pay attention to the main forms and how they connect. The skull forms the frontmost portion of the axial skeleton, and it's a bony framework that protects the brain. Understanding this basic structure, like the rounded brain case and the facial bones, helps you place everything correctly. You know, it's about getting the big shapes right first.
You can achieve a great looking realistic skull by following easy drawing instructions. Start with that circle, add the jaw, and then carefully place the eye sockets and nose opening. Then, focus on the subtle curves and bumps that give the skull its unique texture. Remember, the skull consists of 22 bones, but you don't need to draw every single one. Just imply them through your shading and the overall form. It's a practice in proportion, really.
Fun and Simple Cartoon Skulls
If realism isn't your main goal, drawing a simple skull for a cartoon style is incredibly fun and, frankly, even easier. For this, you can exaggerate features, use bolder outlines, and simplify the shapes even further. Think about what makes a cartoon appealing: clear lines and expressive forms. You can make the eyes bigger, the jaw more pronounced, or even give it a quirky expression. It's all about having a good time with it, you know?
These types of skulls are perfect for quick sketches or for adding a bit of personality to your drawings. They don't require the same level of anatomical precision, allowing for more creative freedom. You can learn how to draw a skull in different styles, and cartoon is a great place to start for beginners. It's a fantastic way to practice your line work and develop your own unique style, too.
Halloween and Day of the Dead Skulls
For Halloween, a simple skull drawing is a classic choice. These often involve a bit of a spooky or stylized look. You can make them look cracked, add exaggerated shadows, or even give them a mischievous grin. The main goal here is atmosphere and fun, not strict accuracy. You know, it's about getting into the spirit of the season.
Day of the Dead skulls, or Calaveras, are another wonderful option. These are typically highly decorative, featuring intricate patterns, flowers, and vibrant colors. You can start with a basic skull shape and then adorn it with your own unique designs. This style allows for immense creativity and is a beautiful way to explore patterns and symmetry. It's a very rewarding type of skull to draw, actually, because you can make it truly your own.
A Little Bit About Skull Anatomy for Artists
While you don't need to become a doctor to draw a skull, knowing a little about its anatomy can truly help your drawings. The skull is a vital bony structure that houses and protects the brain, our most important organ. It also supports several main sensory organs, like your eyes, ears, and nose. This basic understanding helps you grasp why the skull has the shapes and proportions it does, you know?
The human skull consists of 22 bones, divided into the cranium (which encases the brain) and the facial skeleton (which supports the face). When you draw, thinking about these two main parts can guide your hand. For example, the rounded brain case and the facial bones that form the upper and lower jaws, nose, and eye orbits all come together to create the complete form. It's pretty interesting how it all fits together, really.
Understanding the internal structure and proportions, even just generally, helps you draw a skull realistically. The skull provides the framework for your face and forms a protective cavity for the brain. It also gives attachment points for muscles, which is why understanding it is so useful for improving portraits and character designs. You can explore more about human anatomy for artists on our site, which can definitely deepen your understanding.
Tips for Improving Your Skull Drawings
So, you've got the basics of skull drawing easy down, and you're ready to make your drawings even better. One of the best tips is simply to practice regularly. With a little bit of consistent effort, you'll notice significant improvement in your lines, proportions, and overall confidence. Every sketch is a learning opportunity, you know, even the ones that don't turn out exactly as you planned.
Another great tip is to use references. Look at real skulls, anatomical diagrams, or even photos of skulls from different angles. This helps you understand how light falls on them and how the various parts connect. You can find many easy skull drawing ideas with step-by-step guides online, or even printable coloring pages to help you get a feel for the shapes. Just observe closely and try to replicate what you see, which is pretty much what observational drawing is all about.
Don't be afraid to experiment with different tools and techniques, either. Try drawing with pencils of varying hardness, charcoal, or even digital tools. Each medium offers a different feel and can help you discover new ways to express yourself. Remember, there's no perfection required, just a relaxed and expressive approach to your art. Today's tips are all about making your drawing journey enjoyable and productive.
Frequently Asked Questions About Skull Drawing
Q: What is the easiest way to start drawing a skull?
A: The simplest way to begin a skull drawing easy is by starting with a basic circle for the main part of the head. Then, you add a U-shape or an angular form below it for the jaw. After that, you can place simple shapes for the eye sockets, nose opening, and teeth. This approach breaks down the complex form into manageable steps, which is pretty much the best way to tackle it, you know.
Q: How can I make my skull drawing look more realistic?
A: To make your skull drawing look more realistic, focus on understanding basic proportions and adding effective shading. Pay attention to how light and shadow define the skull's curves and hollows, such as the prominent cheekbones and the deep eye sockets. Using references, like photos of real skulls, can also greatly help you capture the subtle details and textures. It's all about observing and translating that observation onto paper, really.
Q: Are there different styles of skulls I can learn to draw?
A: Absolutely! You can learn to draw skulls in many different styles, from highly realistic anatomical representations to simple cartoons, and even decorative Day of the Dead skulls. Each style uses the same basic shapes as a starting point but varies in the level of detail, line work, and emphasis on expression versus accuracy. It's pretty cool how versatile the subject is, allowing for so much creative freedom.
Your Next Steps in Easy Skull Drawing
So, you've learned that skull drawing easy is totally within your reach, no matter your current skill level. You've seen how starting with simple shapes like circles and U-forms can lay a solid foundation for any skull, whether you're going for realistic or cartoon. The key, honestly, is to keep practicing and to enjoy the process. Every line you draw, every shadow you add, helps you get better and more confident in your artistic abilities.
Remember, drawing is a journey, not a destination. Don't worry about perfection; just focus on the fun of creating. Whether you're sketching a skull face for a design, preparing for Halloween, or simply improving your understanding of anatomy for future portraits, these easy steps and tips will guide you. Keep exploring different styles and techniques, and you'll find your own unique way to bring these fascinating structures to life on paper. You know, it's a pretty rewarding artistic endeavor.
Skull Drawing - How To Draw A Skull Step By Step!
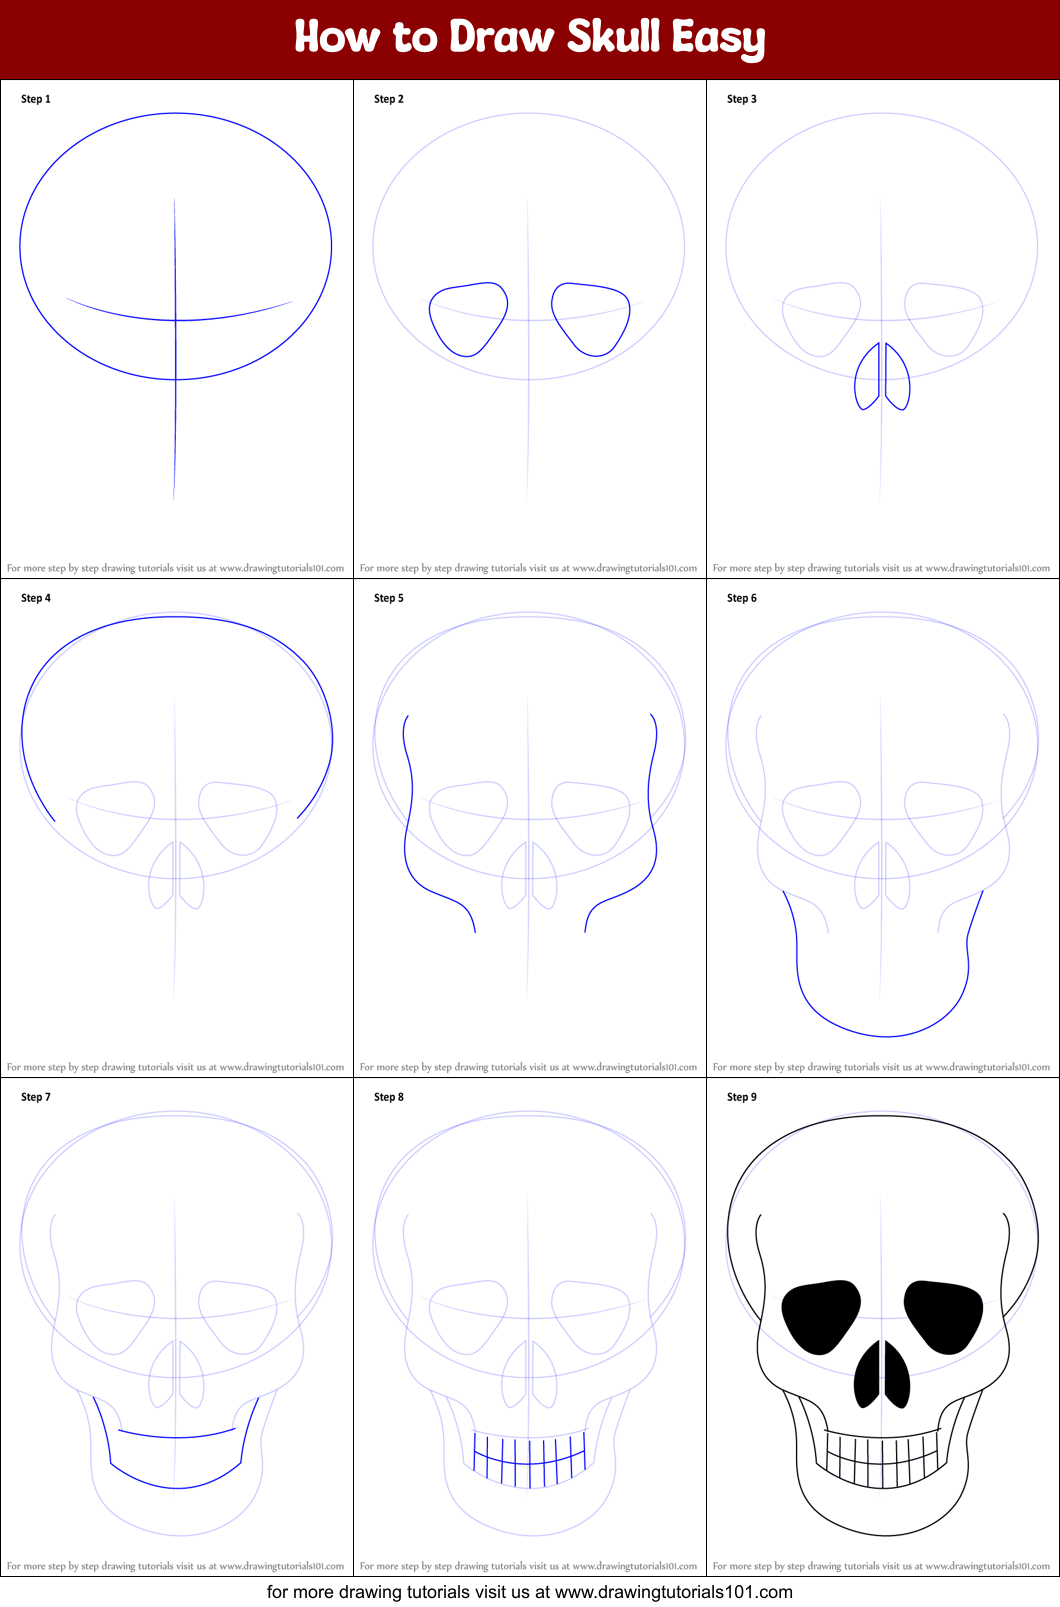
How to Draw Skull Easy (Skulls) Step by Step | DrawingTutorials101.com
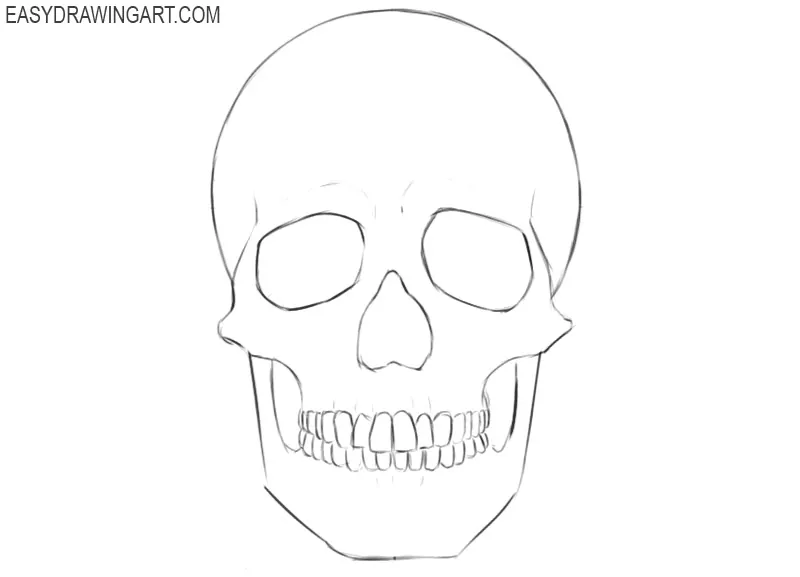
How to Draw a Skull - Easy Drawing Art
