Learning C In Cursive: Your Friendly Guide To Beautiful Handwriting
Have you ever felt a little curious about cursive writing, perhaps wondering how to make those graceful loops and connections? It's a skill that, in a way, feels both classic and, well, rather timeless. Many people, you know, find a real sense of accomplishment when they learn to put pen to paper in this flowing style. And when it comes to starting out, getting a good grasp on the letter "c" in cursive is actually a pretty neat place to begin. It's often one of those foundational letters that, in some respects, helps you get comfortable with the rhythm of cursive itself.
Whether you're a parent looking to share a traditional skill with your children, a teacher searching for helpful resources, or just someone who wants to pick up a new, rather elegant hobby, learning the cursive "c" can be a very rewarding step. It's a letter that, once you get the hang of it, tends to open up the possibility of writing so many other letters with greater ease. Our goal here is to make this learning process as simple and enjoyable as possible, providing you with all the tips and tools you might need.
So, we've put together a friendly guide that focuses entirely on how to write the cursive letter "c," both its lowercase and uppercase forms. We'll walk you through each step, share some helpful practice materials, and even point out a few things to watch out for. It's all about building that muscle memory and getting comfortable with the strokes, which is that, just what we aim to help you do. Let's get started with how to teach cursive, starting with the lowercase, naturally!
Table of Contents
- The Basics of Cursive 'C': Getting Ready to Write
- Writing the Lowercase 'c' in Cursive
- Mastering the Uppercase 'C' in Cursive
- Practice Makes Perfect: Worksheets and Tools
- Connecting 'C' to Other Letters
- Frequently Asked Questions About Cursive 'C'
- A Final Thought on Your Cursive Journey
The Basics of Cursive 'C': Getting Ready to Write
Before you even put your pen to paper, setting yourself up properly can make a very big difference in how easily you learn to write the "c" in cursive. It’s almost like getting ready for any new activity; a good start helps everything else fall into place. We're talking about simple things that, honestly, can prevent a lot of frustration down the road. This initial setup is something that, you know, often gets overlooked, but it's pretty important for comfortable and effective writing.
Getting Ready: Posture and Pencil Grip
First off, let's chat about how you sit and how you hold your pencil. Good posture isn't just for looking proper; it actually helps your arm and hand move freely. Try to sit up straight, with both feet flat on the floor, if you can. Your back should be supported, and your shoulders relaxed. This kind of position, in a way, allows for smoother movements as you write.
Next, consider your pencil grip. You want a hold that's firm but not too tight. A relaxed grip helps prevent hand strain and allows for more fluid lines. Typically, you'll want to hold the pencil between your thumb and forefinger, with the middle finger resting underneath for support. This is that, a pretty standard way to hold a pencil for most writing tasks, and it works very well for cursive too. Remember, the goal is comfort and control, so adjust slightly until it feels right for you.
Paper Position Tips
The way you position your paper can also play a rather significant role in how well your cursive flows. For right-handed writers, it’s usually helpful to tilt your paper slightly to the left. For left-handed writers, a slight tilt to the right often works better. This angle, you see, helps your hand move naturally across the page without smudging what you've just written, especially as you connect letters.
Make sure your paper is stable and not sliding around. You can use your non-writing hand to gently hold the paper in place. This simple step, you know, prevents any unexpected shifts that could mess up your strokes. The video we have provided, by the way, begins with a fun animation with the featured letter before demonstrating the basics of proper posture, pencil grip, and paper position, which is quite helpful for visualizing these points.
Writing the Lowercase 'c' in Cursive
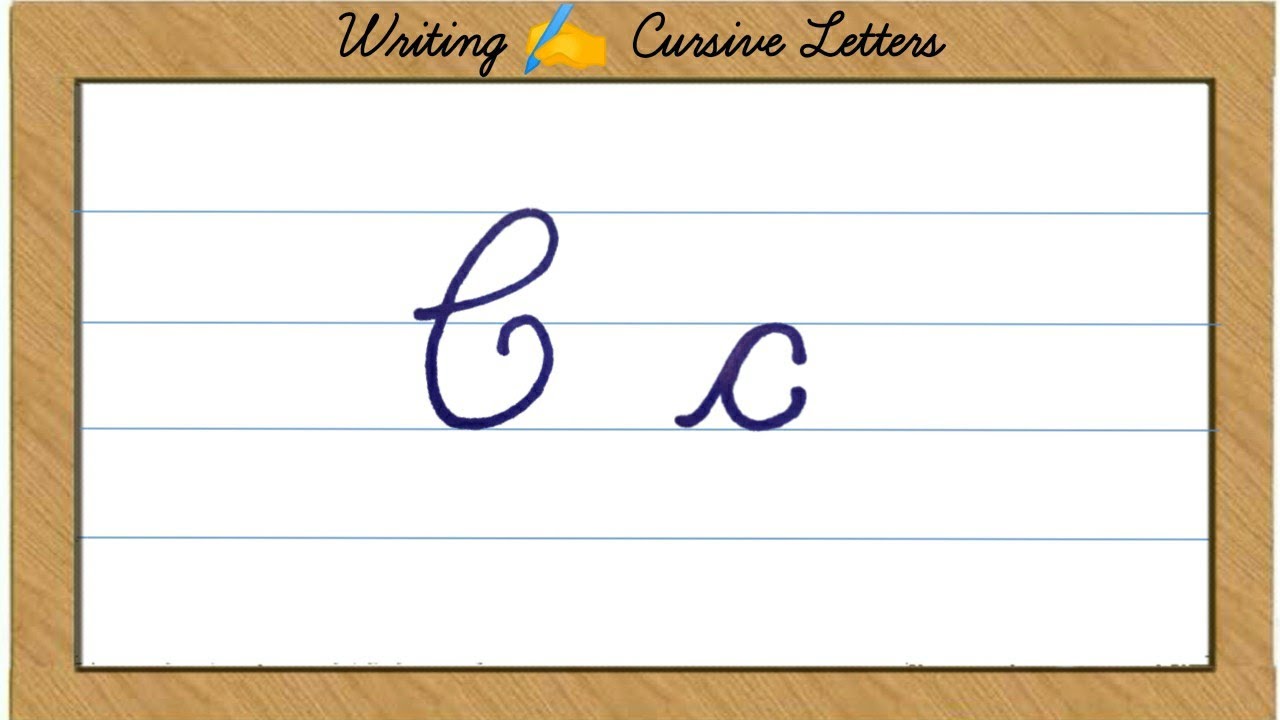
The lowercase "c" in cursive is, in some respects, one of the more straightforward letters to learn. It’s often taught early because its basic shape is, actually, quite similar to its print counterpart, but with a little flair for connection. Getting this letter down well tends to build a good foundation for other letters that share similar curves. It’s all about understanding where to start and how to make that smooth, connecting stroke.
Step-by-Step Guide for Lowercase 'c'
Let’s go through how to make that lovely lowercase "c" in cursive. Remember, practice is key, and it’s okay if your first few tries aren't perfect. The idea is to get a feel for the movement. You know, just keep trying, and you'll get there.
- Starting Point: Begin just below the midline (the dashed line in the middle of your writing space).
- Upward Curve: Make a small, gentle curve upwards, touching the midline. This is that, a very light, almost preparatory stroke.
- Backward Curve: From the midline, curve down and back around to the left, forming the main body of the "c." Think of it as a smooth, rounded shape, similar to the print "c" but with a bit more grace.
- Connecting Stroke: Continue the curve slightly upwards and to the right, creating a small "tail" or exit stroke that will connect to the next letter. This part is pretty important for smooth cursive flow.
- Finish: The letter should sit neatly on the baseline. The connecting stroke should be ready to link up with whatever comes next.
Our tutorial for writing a cursive "c" breaks this down even further, so you can see each part of the stroke. It's helpful to watch someone do it first, which is why, you know, visual aids are so good.
Common Lowercase 'c' Mistakes to Avoid
When learning, it's pretty common to make a few little errors, and that's totally fine! Knowing what to watch out for can, however, help you correct them faster. To avoid these common mistakes, it’s important to understand the proper way to write a cursive “c,” which we have provided in the below video, by the way.
- Too Pointy: Sometimes, the "c" can end up looking too sharp or angular instead of round and flowing. Remember to keep those curves soft and wide.
- Disconnected: A common issue is not making that exit stroke long enough or angling it correctly, which makes it hard to connect to the next letter. Make sure that little tail reaches out.
- Wrong Size: The lowercase "c" should typically fit between the baseline and the midline. If it's too tall or too short, it might look out of place with other letters.
- Starting Too High/Low: Beginning your stroke at the wrong spot can throw off the whole letter's proportion. Always aim for just below the midline to start that initial upward curve.
Paying attention to these small details can, you know, really improve the look of your cursive "c" over time. It's a matter of slight adjustments and consistent practice.
Mastering the Uppercase 'C' in Cursive
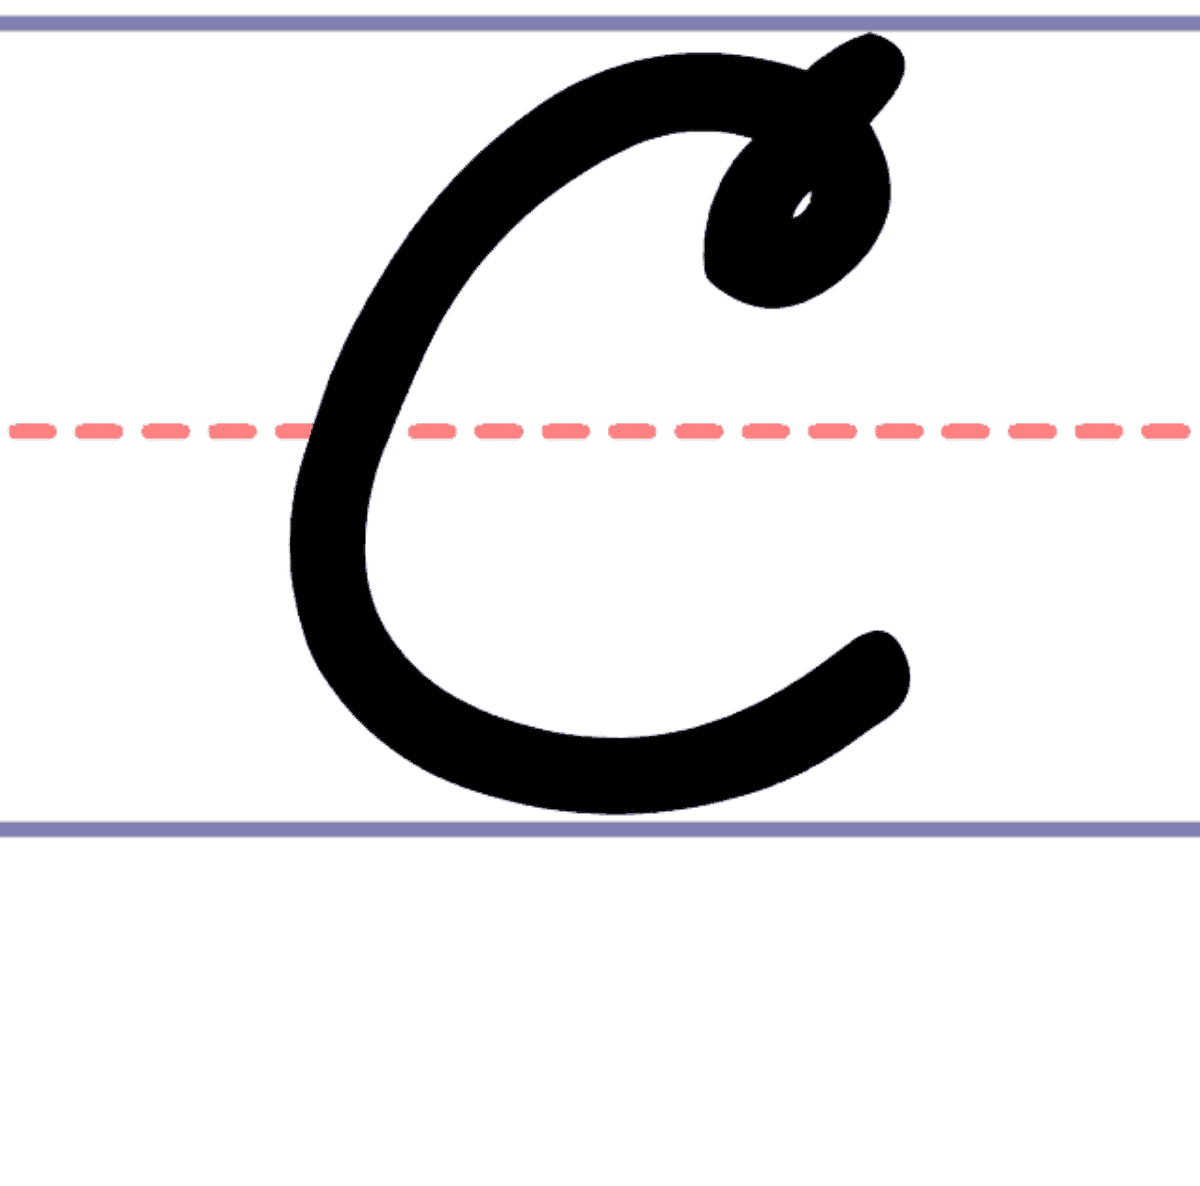
Now, let's talk about the uppercase "C" in cursive. Good news here: cursive capital "c" is one of the easier letters to learn to write! Unlike some other capital letters that have very elaborate loops, the cursive "C" is, in some respects, quite graceful and relatively simple to form. It typically starts with a flourish at the top and then sweeps down, making a rather elegant shape. It’s almost like drawing a big, flowing curve that ends with a little kick.
Step-by-Step Guide for Uppercase 'C'
Here’s how you can create a beautiful uppercase "C" in cursive. This one, you know, often feels pretty natural once you get the initial movement down.
- Starting Point: Begin just above the top line.
- Initial Loop/Flourish: Make a small loop that goes slightly up and to the left, then curves down towards the top line. This is that, the decorative start that gives the capital "C" its distinctive look.
- Downward Curve: From that initial loop, sweep down and to the left, creating a large, open curve. This curve should extend below the baseline slightly, giving the letter a nice presence.
- Upward Sweep: As you reach the bottom, curve back up and to the right, crossing the initial downward stroke near the baseline. This creates the bottom part of the "C."
- Exit Stroke: Continue the upward sweep slightly to the right, forming a small tail that can connect to the next letter, if needed. This is pretty similar to the lowercase "c" in its function.
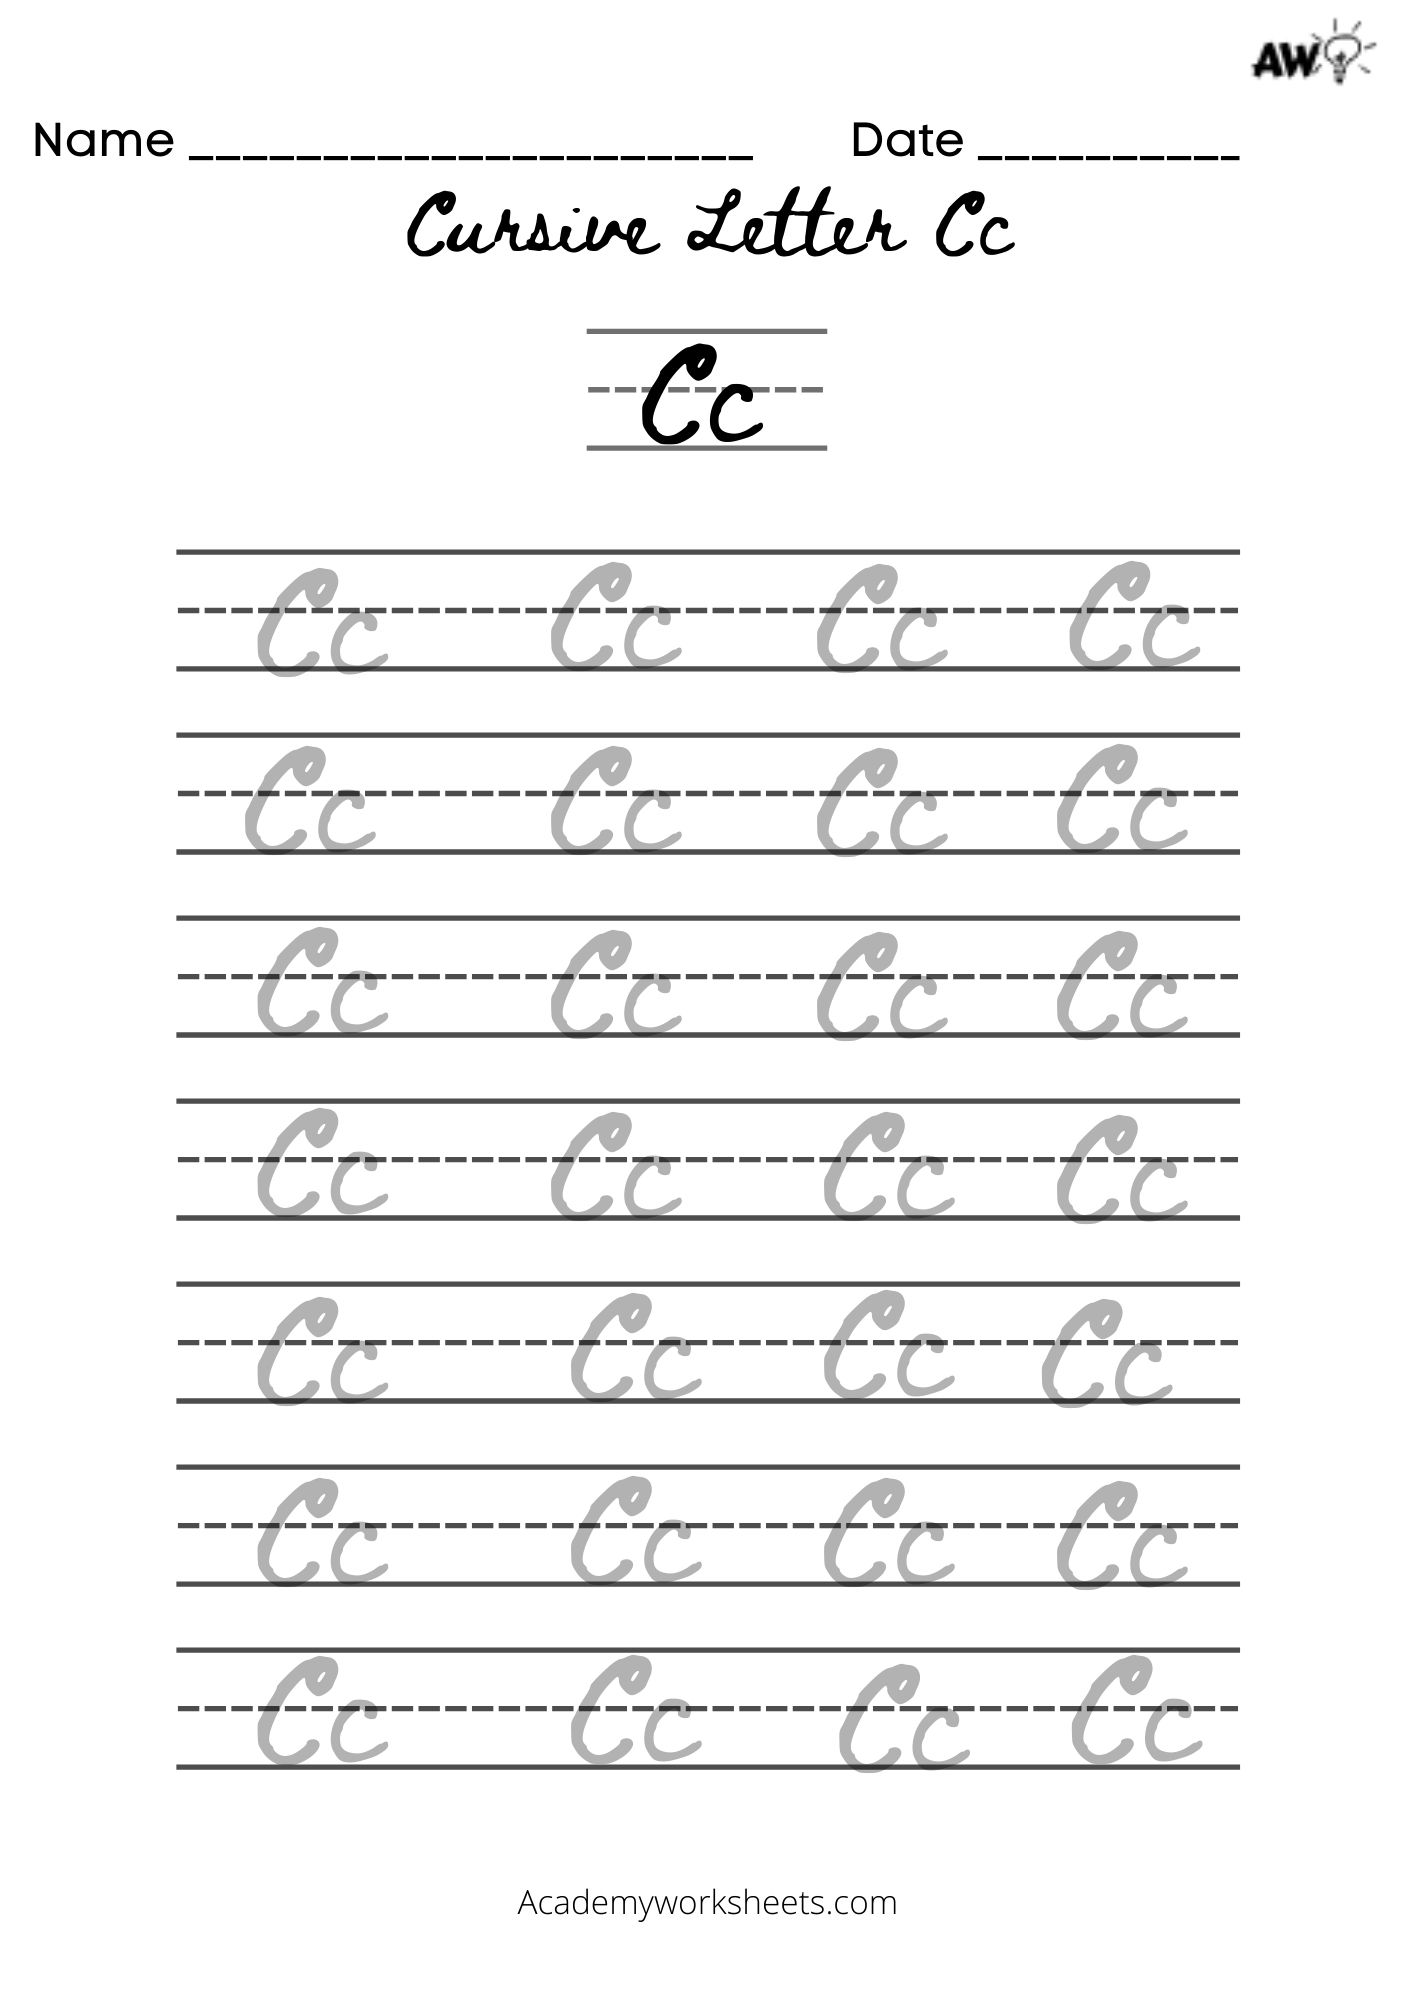
This uppercase letter "c" cursive worksheet, by the way, provides your student with extra practice with starting points, stroke order, and, you know, getting that flow just right. It's a very helpful tool for building confidence.
Why Uppercase 'C' is a Bit Easier
Many people find the uppercase "C" in cursive less challenging than some other capital letters. Why is that? Well, for one, its shape is, actually, quite intuitive. It doesn't have too many intricate loops or confusing changes in direction. It’s mostly one continuous, sweeping motion. This simplicity means there are fewer places where you might get stuck or make a mistake, which is that, pretty encouraging for beginners.
Also, the capital "C" doesn't always need to connect to the next letter in the same way lowercase letters do within a word. While it has an exit stroke for connection, you know, it’s often used as the first letter of a proper noun, so its primary job is to look good on its own. This makes it a bit more forgiving, allowing you to focus on forming the letter itself without worrying too much about the immediate connection. It’s a very satisfying letter to write, honestly.
Practice Makes Perfect: Worksheets and Tools
Learning to write the "c" in cursive, or any letter for that matter, really benefits from plenty of practice. It's not just about knowing the steps; it's about building muscle memory so that the movements become second nature. Luckily, there are a lot of great resources available to help you or your students get that valuable practice. You know, it's pretty important to have good materials to work with.
Your Free Cursive 'C' Worksheets
We believe in making learning accessible, which is why we’ve created a collection of resources for you. On this page, you will find 10 original cursive "c" worksheets that are all free to download or print. These worksheets are great for teachers and parents who want to teach their students or children. They provide structured practice, helping with starting points, stroke order, and consistent letter formation.
Each individual printable worksheet is free and can help children to learn to write in cursive and build muscle memory in writing. Grab all ten of my cursive letter "c" tracing worksheets here. They're designed to be used repeatedly, so you can print as many copies as you need. This kind of repetitive practice, you know, is very effective for handwriting improvement.
Using Videos and GIFs for Learning
Sometimes, seeing a letter being formed in real-time is far more helpful than just reading instructions. That's why we’ve also included visual aids. There is also a short gif showing writing both uppercase and lowercase versions of the cursive "c." These little animations can be played over and over, allowing you to observe the exact path of the pen. It's a very clear way to see the proper stroke order and flow.
Our video tutorial is another fantastic resource. The video begins with a fun animation with the featured letter before demonstrating the basics of proper posture, pencil grip, and paper position. To avoid these common mistakes, it’s important to understand the proper way to write a cursive “c,” which we have provided in the below video. Seeing these foundational elements in action can, you know, really make a difference in your technique.
Apps to Help You Practice
In addition to printable worksheets and videos, there are digital tools that can help. For instance, you can learn how to write the lowercase and uppercase letter "c" in cursive with the Letter School app! Apps like this often provide interactive tracing exercises, immediate feedback, and a playful learning environment, which can be particularly engaging for younger learners. They offer a different kind of practice, one that, you know, is pretty convenient for on-the-go learning.
Combining these different methods – worksheets for hands-on tracing, videos for visual guidance, and apps for interactive play – can create a very well-rounded learning experience. It’s all about finding what works best for you or your student, and using a variety of tools can, honestly, make the process more enjoyable and effective.
Connecting 'C' to Other Letters
Once you feel pretty good about writing the individual "c" in cursive, both lowercase and uppercase, the next step is to think about how it connects to other letters. This is that, what truly makes cursive flow and look beautiful. The "c" is, in some respects, a great letter to practice connections with because its exit stroke is fairly straightforward. After learning how to make cursive "c," students can then easily transition to several other cursive letters.
Building Cursive Flow
The lowercase "c" ends with an upward stroke that reaches out to the right, ready to join the next letter. For example, when writing "cat," the "c" connects smoothly to the "a." The "a" then connects to the "t." This continuous flow is a hallmark of cursive writing. Practice linking "c" with common letters like "a," "o," "e," and "l" to get a feel for the rhythm.
Building this flow is, actually, all about consistency in your exit and entry strokes. Every letter has a specific way it begins and ends to allow for these connections. The more you practice these links, the more natural and fluid your handwriting will become. It’s a bit like learning to dance; you master the individual steps, then you learn how to put them together in a seamless routine. Learn more about cursive writing basics on our site, and for more specific letter practice, link to this page our full cursive alphabet guide.
Frequently Asked Questions About Cursive 'C'
People often have a few common questions when they're learning to write the "c" in cursive. Here are some answers to things you might be wondering, which is that, pretty common for new learners.
How do you write a capital C in cursive?
The capital "C" in cursive typically starts with a small loop above the top line, then sweeps down in a large, open curve that goes slightly below the baseline, and finally curves back up and to the right, often crossing the initial downward stroke. It’s a very graceful, single motion.
Is cursive c hard to write?
No, honestly, the cursive "c" is generally considered one of the easier letters to write, especially the uppercase version. Its shape is pretty intuitive, and it doesn't have too many tricky loops or turns, making it a good starting point for beginners.
What letters are easy after cursive c?
After mastering the cursive "c," you'll find that letters like "a," "d," "g," "o," and "q" become much easier. This is because they share similar initial strokes or curves, building on the muscle memory you developed with the "c." It’s almost like a stepping stone to other letters.
A Final Thought on Your Cursive Journey
Taking the time to learn the "c" in cursive, both its lowercase and uppercase forms, is a very rewarding step on your handwriting journey. You've explored the proper setup, walked through the steps for each letter, and discovered helpful practice tools like our free worksheets and videos. Remember, building muscle memory takes consistent effort, but the payoff is a skill that, you know, can bring a lot of satisfaction.
So, keep practicing with those worksheets, watch the videos as many times as you need, and just enjoy the process of seeing your handwriting transform. It’s a skill that, in a way, connects us to a bit of history while also being a lovely form of personal expression today. You can find even more resources and tips on our main site, for example, at cursivewriting.org, which is a great place to explore more about this beautiful art.
- 9 In Spanish
- Apothecary Diaries Characters
- Bonnie Blue Onlyfans
- Janet Von Schmeling
- Bella Thorne Naked
The Letter C In Cursive
Cursive C
Letter C In Cursive
